Tom Goddard
June 8, 2009
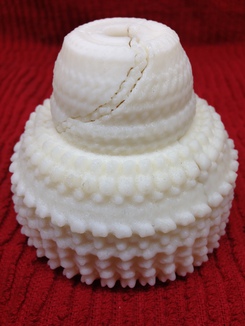
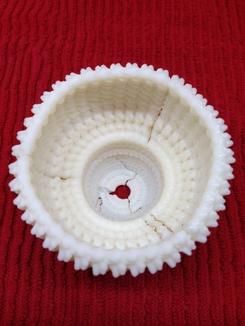
Here are notes on designing and printing a four piece plastic model of a rat liver vault molecular assembly.
|
|
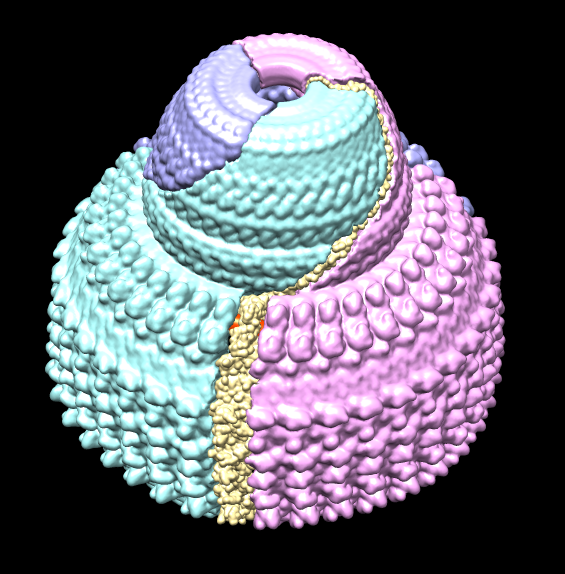
| Model design shown in Chimera. Magnets in orange. |
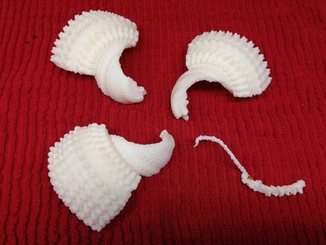
Model of rat liver vault, PDB entries 2zuo, 2zv4 and 2zv5. The June 2009 molecule of the month illustration describes this structure. This model is split across 3 files because its 242,000 atoms exceeds the 100,000 atom limit of the PDB file format. It is one of only 2 current pdb entries using split records. It is 39 copies of what appear to be identical protein monomers. It is odd and inconvenient that they did not include just one monomer and use non-crystallographic symmetry MTRIX records or biological unit (BIOMT) matrices to describe the complex. The 39 copies are split into groups of 13 per file. Two sets of 39 copies are stacked end-to-end to form the vault complex, but the plastic model includes only one set of 39 monomers.
1 mm = 5 Angstroms
The half-vault is about 350 Angstroms high with similar diameter. Measured that with the scale bar tool (Chimera menu entry Tools / Higher-Order Structure / Scale Bar). The default scale for models provided as STL files for the uPrint Personal 3D Printer is 1 unit = 1 millimeter. A scale factor can be used when submitting the print job. The STL files exported from Chimera have units matching those of the source PDB models, Angstroms. I chose a scale factor of 0.2 so the 350 unit high model is printed 70 mm (~2.75 inches) high. Maximum printable dimensions are 8 x 6 x 6 inches but long printing times limit the size chosen.
5-10 Angstrom resolution molecular surfaces
The printer layer thickness (z-resolution) is 0.254 mm (0.01 inches) equal to 1.27 Angstroms at the chosen scaling. Any detail to be seen in the plastic model needs to be somewhat bigger than this. I used molecular surfaces with resolutions of 10 Angstroms for three large pieces (12 or 13 monomers) and 5 Angstroms for the piece that is a single monomer. The higher resolution for the monomer was chosen to see the protein domain divisions more easily. The resolution values are specified in the molmap command.
1-2 Angstrom grid spacing
To keep the STL files for the surfaces for the pieces reasonably small (~10 Mbytes) I want to avoid surfaces with extremely high numbers of triangles. This may also speed up processing and on-screen rendering by the printer software. No point in using triangles smaller than the printer resolution. I used grid spacing of 2 Angstroms for the large pieces and 1 Angstrom for the monomer piece with the molmap command.
The pieces are described by surfaces. The four pieces are 2zuo chain A, 2zuo all chains except A, 2zv4, 2zv5. I used the molmap command to make density maps for each piece from the set of atoms for that piece, for example,
	molmap #0:.A 5 gridSpacing 1 modelId 3
	molmap #1 10 gridSpacing 2 modelId 4
I chose a contour level of 0.03 based on visual inspection avoiding disconnected surface pieces and giving desired appearance.
The contour surfaces created from density maps for the pieces intersect each other. To allow the pieces to fit together I masked two of the density maps setting them to zero inside the surfaces of the other two density maps. This clips two of the pieces against the other two so that each of the 4 piece-piece contacts has had one surface clipped to match the other (which is unaltered). The unaltered pieces are the monomer and the 13-monomer piece that does not contact the monomer. The mask commands look like:
mask #4 #3,5 invert True
To provide some extra padding I lowered the surface contour level to 0.005 for the masking surfaces to expand them a bit.
This procedure doesn't guarantee that the pieces can be moved into the desired contact. They may be interlocked in that position. Visual inspection suggested they would not be interlocked for this model. For another two piece model of part of hepatitis virus capsid the interlocking problem occured.
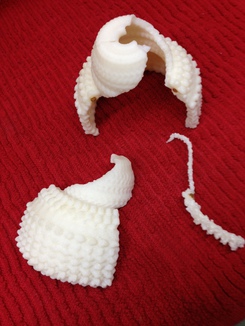
The model consists of four pieces joined by small cylindrical magnets, 1/8" diameter x 1/16" thick, neodymium. The magnets are glued in place after printing. Each pair of contacting pieces is connected by a pair of magnets, one magnet of the pair embedded in each piece. Divots were placed in the surfaces by masking the piece density maps using a cylinder equivalent in size to two stacked magnets (1/8" diameter, 1/8" height). The cylinder is created with the shape command:
shape cyl radius 19 height 19 cap True
1/8 inch = ~16 Angstroms at the chosen scale. I increased this ~20% using 19 Angstroms to make sure the holes are not too small. Still the holes were a bit too small in the printed model and had to be scraped with a knife to expand them so the magnets fit.
After hand-placing a cylinder between each two pieces the masking for each piece density map to create the divots was done using the mask command. The two cylinders intersecting the piece were selected by hand and then used:
mask #3 sel invert True modelId 6
Positioning the four pieces on the printing platform in the printer software was done to minimize the height (fewer layers), and hopefully minimize the amount of support material needed and printing time. The printer layout software is very cumbersome to use and this step took about 30 minutes for the four pieces. It is possible that a taller orientation with smaller x-y cross-sections might reduce support material used and print time. Hard to evaluate since the positioning user interface is so difficult, and the calculation to estimate the material use and print time is very slow, taking a minute or two for each piece.
It may be useful to choose the orientation for printing in Chimera before writing the STL file. Maybe all 4 pieces could be packed, not touching each other, in one STL file.
Printing required ~3 cubic inches of material, ~3 cubic inches of support material, and about 14 hours.
Here are the stl surface files for the 4 pieces that were printed on the uPrint printer, and the Chimera session and density maps used to make this model. vault.zip.