Tom Goddard
goddard@sonic.net
Updated October 31, 2025. 18 updates since March 24, 2023.
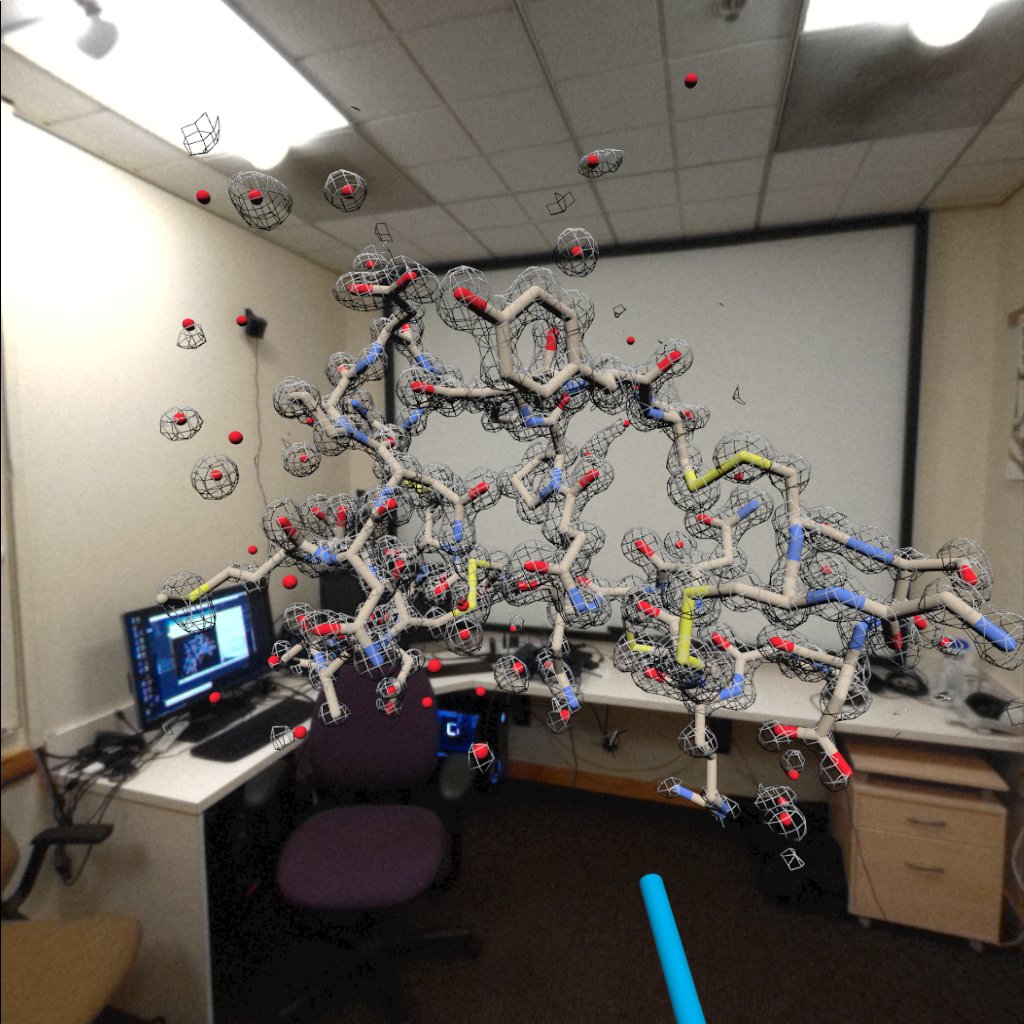
The LookSee application is for viewing molecular structures (proteins, nucleic acids, small molecules), and electron microscopy and X-ray density maps in Quest (3, 2 or Pro) virtual reality headsets. LookSee uses "pass-through" video that shows the room in addition to your molecular and cellular data and allows multi-person sessions.
Models are sent from the ChimeraX molecular visualization desktop application using the Send to Quest tool in menu Tools / General. Any kind of data shown in ChimeraX can be viewed, and it can be sent from any computer (Mac, Linux, Windows) that can run ChimeraX, not requiring high-performance VR graphics. Send to Quest is in ChimeraX daily builds newer than March 22, 2023.
October 2025.
Unfortunately this project is no longer being developed because Meta policies have prevented distribution
of the application on the Meta Quest store. To distribute an application, Meta requires the developer
created a "verified organization". I have not been able to make a verified organization for
my Univerisity of California San Francisco lab. Meta requires either a business license or personal
info such as a photocopy of a drivers license to create a verified organization. The lab does
not operate with a business license and I won't provide personal info. I tried for the last few
years through Meta support to find a solution but they are inflexible. I offered to provide a
drivers license with personal info removed (home address, weight, height, eye color, California ID...),
tried providing UCSF ID, tried providing our extensive lab web site as verification, tried using
personal connections at Meta, none of which worked. Meta Quest VR app distribution is controlled
by Meta with alternatives (SideQuest, side-loading, developer accounts) greatly limiting the
audience of users. It does not make sense to invest more time in the LookSee project with such
severe restrictions on distributing the application, currently available through a prerelease
channel with limited registration to 200 users.
A LookSee release candidate is on the Meta AppLab store. To get it join the LookSee release candidate channel using any web browser. After joining LookSee may appear in your Library panel in the Quest headset. Online Meta documentation says the prerelease appears in "My Preview Apps" in the app library, although I do not see that in my Quest 3 headsets (runtime v71). Formerly you could search the Store in the Quest headset for LookSee and press the install button, but that search now fails (tested Dec 3, 2024). Email me if you figure out how Meta's pre-release install works. A much more difficult method for installing LookSee directly from a .apk file is described below.
|
|
| LookSee |
|
|
| ChimeraX Send to Quest |
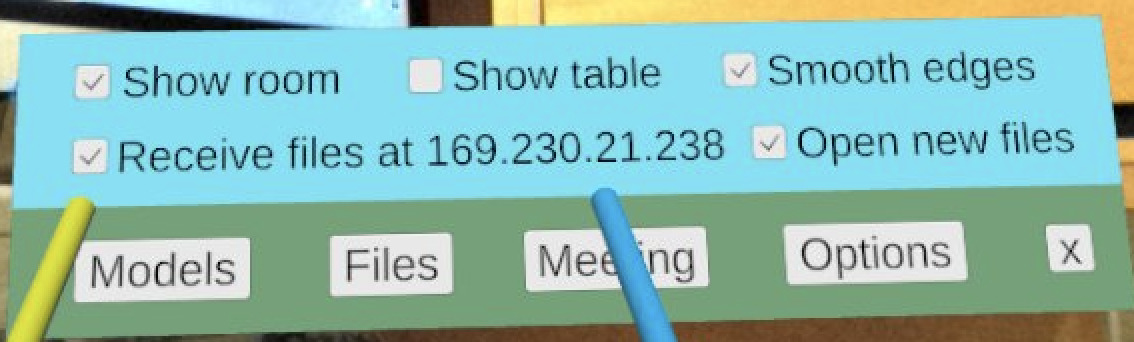
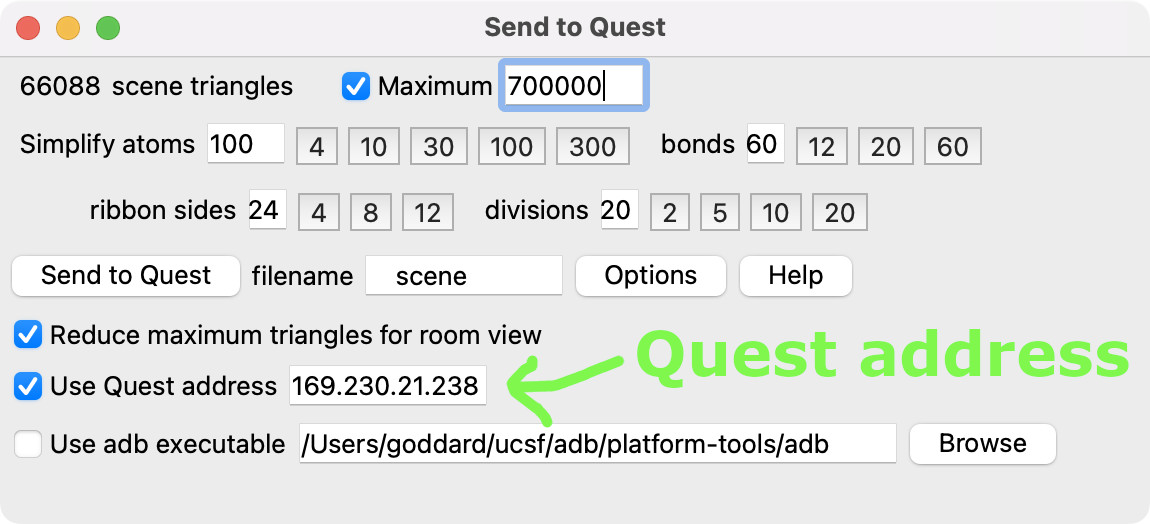
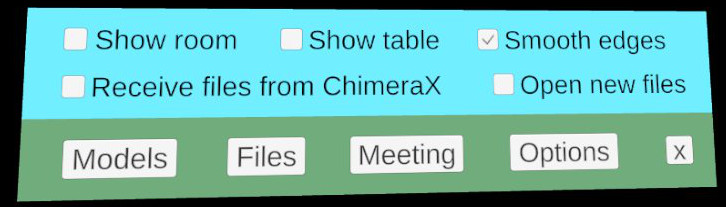
Use the ChimeraX Send to Quest tool in menu Tools / General in ChimeraX 1.7 or daily builds newer than April 12, 2023. Enable "Receive files from ChimeraX" in the LookSee user interface Options panel on the Quest by clicking the checkbutton. The "Receive files from ChimeraX" text will change to "Receive files at 192.168.0.157" indicating the internet address for the Quest headset. Enter that address (192.168.0.157 in this example) into the ChimeraX Send to Quest panel under Options. After entering the address, the Send to Quest button transfers the current scene shown in ChimeraX to the Quest headset and displays it. This works by ChimeraX creating a GLTF scene file and sending it to the LookSee application.
There are other ways to transfer GLTF files to the Quest that do not require wifi or ChimeraX.
Sometimes ChimeraX cannot send a scene file to the Quest headset. This will happen if the Quest headset is sleeping. It can also happen because the Quest headset is on a WiFi network that is not visible to the computer that is running ChimeraX. One solution is to have the computer running ChimeraX use the same WiFi network as the Quest headset. Even if both the computer and the Quest headset are on the same WiFi network sending a file may not be possible. This is often the case on "Guest" WiFi networks that block any communication between devices as a security measure. For example, Send to Quest does not work on the University of California San Francisco Guest WiFi. But it does work on the UCSF Secure WiFi network. Secure WiFi networks are more likely to allow the connected devices to communicate with each other.
Here is a summary of what the hand controller buttons do. More details are described in sections below. The application can also be controlled using hands without controllers as explained below.
To move a model you hold the trigger button (index finger) of either hand controller. You point toward the center of the model you want to move if there are multiple models open. With two hands you can move two models at the same time.
Pushing the hand controller thumbstick backward or forward scales a model you are pointing at bigger or smaller. If multiple models are shown they can be zoomed to different scales. Pressing both grip buttons with both controllers pointing at the same model and moving the controllers further or close to each other (pinch gesture) will also scale the model.
|
| Models |
|
| Files |
|
| Meeting |
|
| Options |
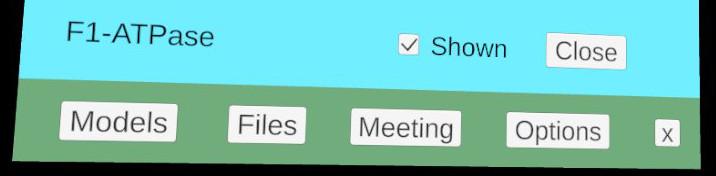
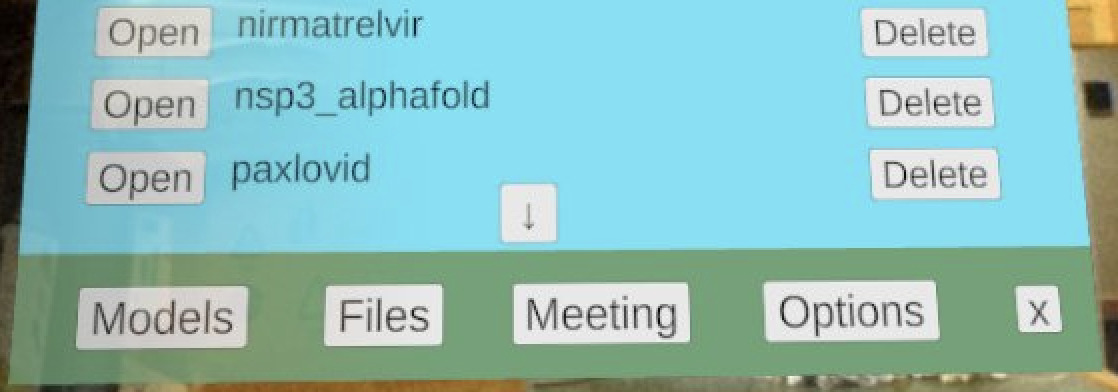
The A or X button on the controllers shows user interface panels positioned at the tip of the wand. The panels list the currently open models, show files you can open, allow you to start a multi-person meeting, or set options such as whether pass-through video is enabled. Touch a button with the blue or yellow wand until the button turns blue and than click the trigger button (index finger) on the hand controller. The "x" button in the lower right corner of the panels closes them or pressing the A or X button on the controller closes them.
Hiding, showing, closing and opening models
Pressing the Models button shows currently opened models which can be hidden or reshown
using the shown checkbutton or closed with the close button.
Pressing the Files button shows a list of the GLTF files saved on the Quest headset that you can open.
If more than one model is open, you can show one model at a time in sequence by moving the hand
controller thumbstick right (next model) or left (previous model). This hides the currently
shown model and shows the next or previous one.
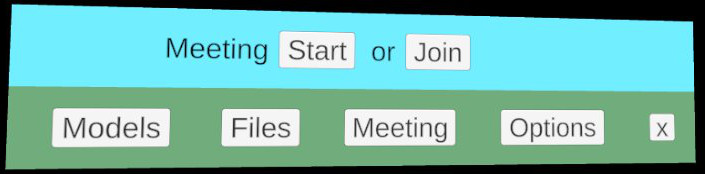
Meeting: multiperson sessions
The Meeting button shows Start and Join buttons that allow starting a new meeting or
joining a meeting started by another person. See the meeting
documentation for details.
Options
The Options button shows several settings. Most of these settings are remembered from one session
to the next.
LookSee can be used without hand controllers using hand gestures. You need to enable hand tracking on your Quest headset.
You can switch between using hand controllers or bare hands at any point while using LookSee by just putting down or picking up the hand controllers. If you are using hands then you will see black models of your hands with blue and yellow balls at your two index fingers. You can press buttons on the user interface panels by touching them with the blue and yellow balls.
To show or hide the user interface panels turn your left hand palm towards you and spread your thumb and index finger until the menu icon (circle with 3 horizontal lines) appears, then bring your thumb and index finger together on the menu icon. This is the standard Quest hand tracking menu operation.
To move models pinch your thumb and index finger together and move and rotate your hand while pinching to move the model. The model that is moved is the one in the direction of your hand when the pinch is done. This pinch gesture acts like the trigger button with controllers. By pinching with both hands and moving your hands together or apart you can scale a model. The pinch gesture works best when thumb and index finger are closer to your eyes than your other fingers. With Quest runtime v62 I find it often does not recognize the pinch reliably with other hand orientations, probably because the headset does not have a clear view of your fingers.
|
| ChimeraX controls to speed up scene rendering |
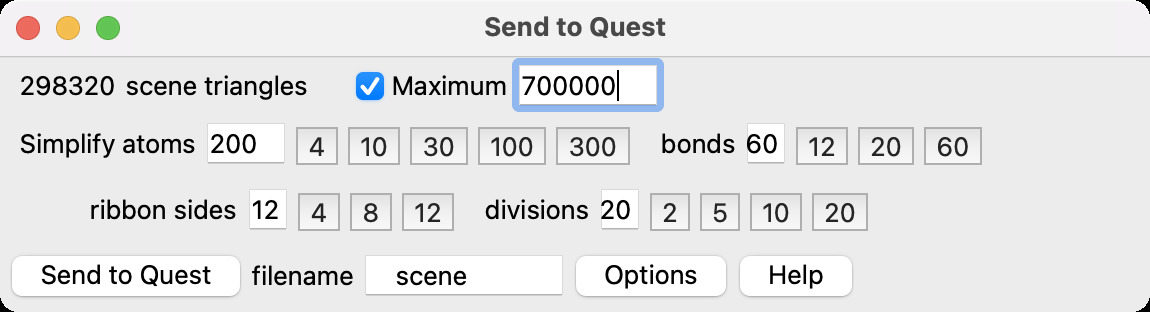
The Quest 2 and Quest Pro will show the molecular data without using the computer. You can disconnect the headset from the computer if you wish. The Quest headsets run on about 5 watts of power, far less than the 300 watts of a typical PC VR graphics card. So they cannot render complex scenes fast enough. Testing shows the LookSee app can show about 900,000 triangles without flickering if the room is not shown or about 700,00 triangles if the room is shown with pass-through video.
The Send to Quest panel in ChimeraX shows how many triangles the currently displayed scene is using. This will often be too large because ChimeraX uses a 10 million triangle target on laptop and desktop computers. You can reduce the number of triangles used to draw each atom, bond, and ribbon residues with the buttons in the panel. Ribbons have a number of sides (around the circumference) and a number of divisions (along the ribbon axis for one residue). Usually you can vastly reduce the number of triangles while maintaining acceptable appearance. For density maps using step 2 (every other grid point) or showing only a zone around an atomic model (Map toolbar, Zone icon, or "volume zone" command) can reduce the number of triangles.
The Send to Quest app limits the triangles of each scene (if the maximum checkbutton is enabled). But you can open as many scenes as you want and if the total number of triangles is too high, the Quest will start to flicker or lose tracking which can cause nausea and should be avoided. It may even be hard to quit the application (click the System hand controller button and click on the Quit button that appears).
No data used in LookSee is shared and no servers are used. Privacy policy.
Handle larger scenes. Currently LookSee uses GLTFast to read GLTF files and create Unity graphics. The speed of the graphics shader programs it uses determines how many triangles can be in a scene before flickering occurs. The Unity standard shaders handle about 1.7 times as many triangles as the GLTFast shaders. Bigger scenes could be shown with simpler shaders. The fancier material properties (e.g. metalicity and roughness) offered by slower shaders are less important for molecular data than handling larger scenes.
Faster transfer of models in meetings. Currently a large (900K triangle) model will transfer in about 3 seconds in a two-person meeting after one person opens it using a modern wifi 6 router. But with slower wifi it can take up to 30 seconds to transfer a large model in a 3-person meeting where all 3 headsets are sharing the wifi router bandwidth. This problem is described in ticket #9801. There are easy code improvements which will reduce the fast wifi case to 1.5 seconds, but with slow wifi the best option might be to show a progress message to participants waiting to receive the scene data.
The implementation, debugging, optimization and design ideas are discussed in ChimeraX ticket #8357 and details of transfering files to the headset in ticket #8509.
The version number is reported on the splash screen when the LookSee application is started. Source code for LookSee is on Github.
|
| SideQuest |
We recommend installing LookSee from Meta App Lab instead of the much more difficult approach described here.
To install Quest apps that do not come from the Meta Oculus app store you use a computer application called SideQuest. Meta makes this especially painful -- you need to enable Oculus developer mode to "side load" applications provided as .apk files. Install the SideQuest "Advanced installer", not the "Easy Installer" because you need it to install applications from ".apk" files. Follow the Advanced Installer tutorial.
The video claims you have to provide a credit card number and phone number to verify the account. I found this not to be true. I did not provide any credit card number (and would not give that to Meta). But it was necessary to enable 2-factor authentication with a cell-phone to enable developer mode. Also there is no need to create a SideQuest account unless you also want to download apps from the SideQuest app store.
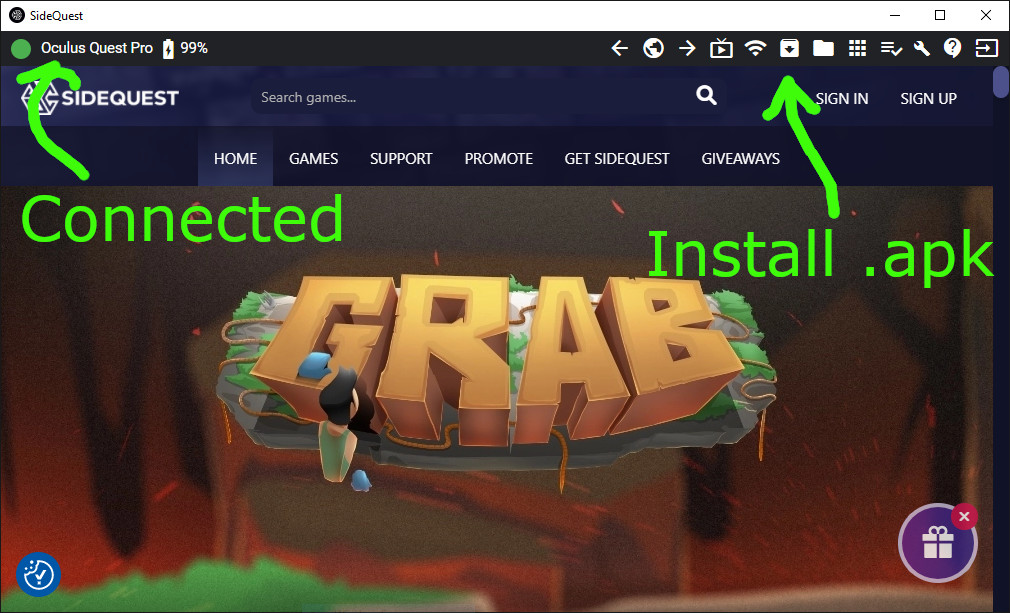
Once SideQuest is installed, you run it, connect your Quest headset to the PC by a USB cable and click Allow in the headset so the computer can access the headset. SideQuest will show in the upper left corner that it sees the Quest headset. Then pressing the folder icon labeled with a down arrow among the SideQuest upper right icons allows you to choose the looksee_v12.apk file and installs it on the Quest in a few seconds. Older versions are listed below.
|
| Quest applications from unknown sources |
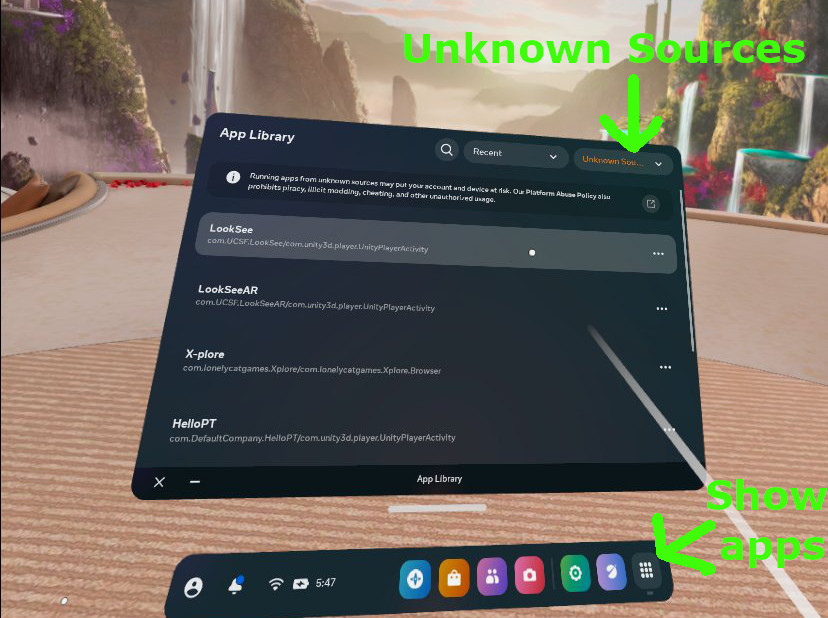
How to run LookSee. When installed from a .apk file LookSee will be found in the Quest headset App Library under "Unknown Sources". Click the Search entry field in the App Library and a menu allows choosing "Unknown Sources" which will list LookSee that you can click to run.
There are two other ways to send scenes from ChimeraX to the Quest headset for viewing that are more trouble to setup and use but may help if firewalls block your PC from sending files to the Quest using wifi.
|
| Windows File Explorer |
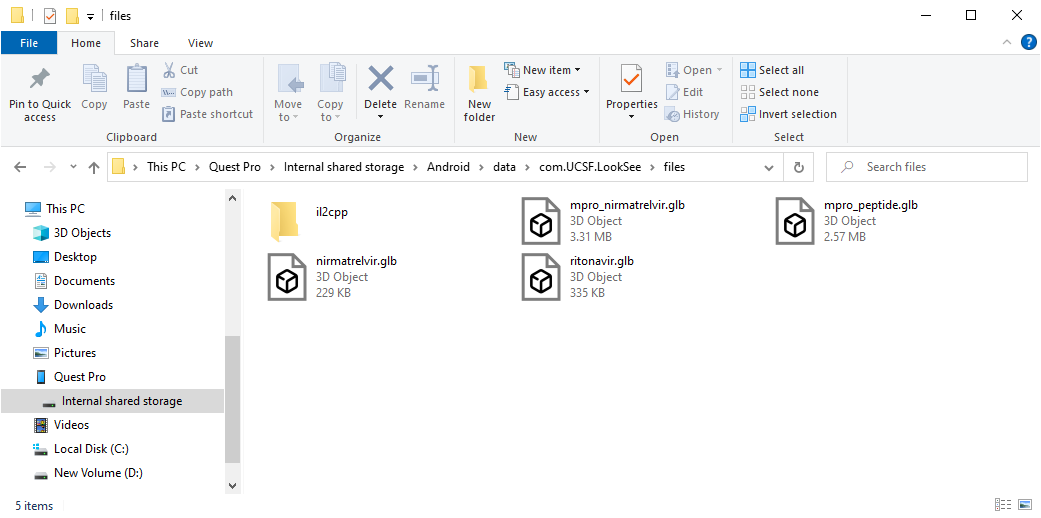
Another way to transfer a GLTF scene file to LookSee on Windows is to connect the Quest headset with a USB cable to the PC. In the Quest headset you will need to press the Allow button that appears to allow the PC to write files to the Quest. Then the Windows the File Explorer will show a "Quest 2" or "Quest Pro" entry in the left column. You can then drag and drop *.glb files written by ChimeraX (command "save myscene.glb") to the following Quest directory
/ThisPC/Quest 2/Internal shared storage/Android/data/com.UCSF.LookSee/files
On Mac or Linux there is no file browser access to a connected headset.
A third way to transfer a GLTF scene file from a computer to the Quest headset is to use the Android Debug Bridge command-line program adb. You connect the Quest to a computer (Mac, Linux or Windows) with a USB cable. Then the adb program can copy files from computer to Quest using a command like
adb push myscene.glb /sdcard/Android/data/com.UCSF.LookSee/files
The ChimeraX Send to Quest tool can use adb if desired using the "Use adb" setting under Options. Then pressing the "Send to Quest" button will write the current scene as a GLTF file and use adb to transfer the file. In the LookSee app the user interface has a "Open New Files" checkbutton (default off). If you enable this (touch and click with trigger) then when a new file is sent with Send to Quest it will automatically open. If not enabled, you can reshow the user interface and there will be an Open button that can be pressed to open the new model.
The "adb" program is part of Android Studio SDK Platform Tools. You get adb by downloading the SDK Platform-Tools zip file.
It is also possible for adb to send the file to the Quest by wifi without the usb cable being connected using the "adb tcpip 5555" and "adb connect [quest-ip-address]" commands from a terminal.
ChimeraX on a Windows PC can also directly render molecular scenes to virtual reality headsets and allow using of the ChimeraX desktop user interface directly in the headset with hand controllers. This does not use the LookSee application. Headsets such as the Quest 3/2/Pro, Valve Index, or HTC Vive Pro can be used either tethered by a cable to the PC or over wifi. This alternative VR method is enabled with the ChimeraX vr on command and uses SteamVR or with the equivalent xr on command which uses OpenXR. It requires Windows 11 or 10 and a high-end VR-capable graphics card.